Showing posts with label DIY. Show all posts

5.02.2012

Off Loom Beading

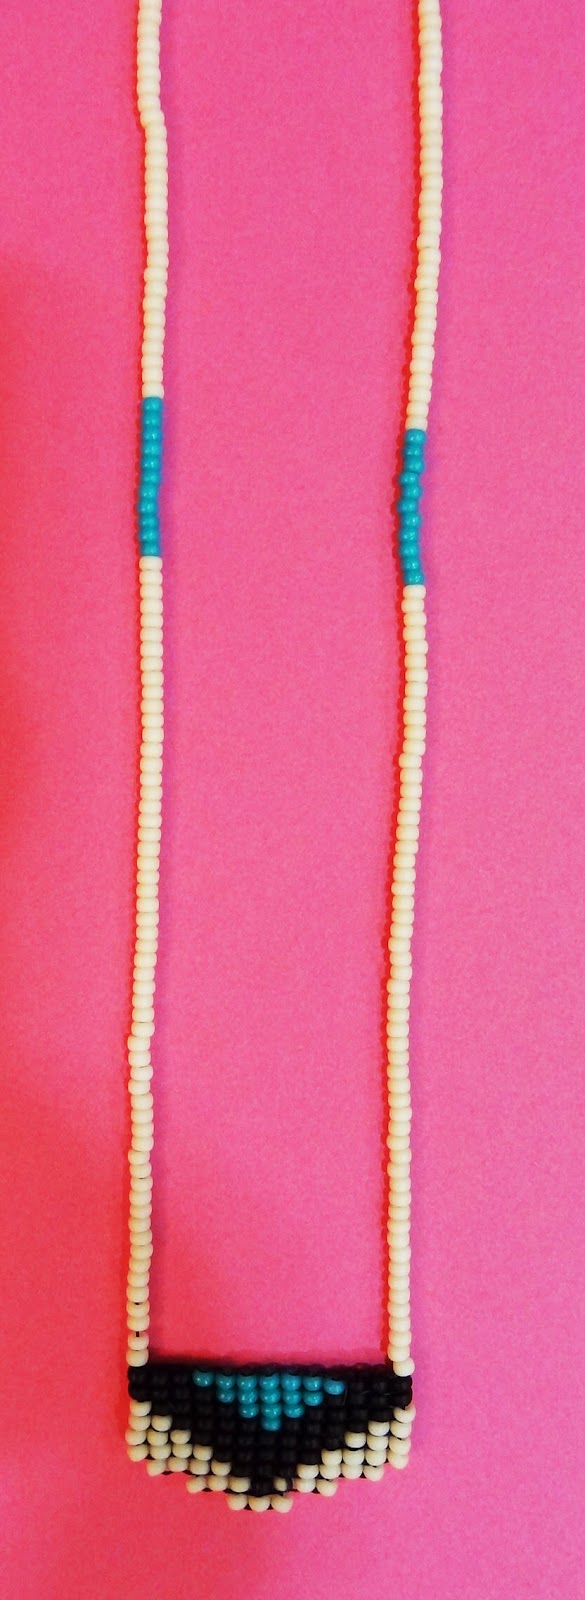
I recently purchased a bead loom and love being able to make "fabric" out of beaded patterns (seen here).  On the loom, you are restricted to square/rectangular shapes, and setting up the loom and finishing off your piece can be frustrating.  I started looking into bead weaving off of the loom, and this is a great straightforward tutorial to get you started.  I made this necklace last weekend and I can't wait to experiment with more shapes/patterns...


4.25.2012

Chain Ring DIY

I couldn't wait to make some of my own delicate gold chain rings based on this tutorial, from the always creative and inspiring a pair & a spare.  You can make these in a quick minute!  I used a larger jump ring than the chain links for added effect with some colorful seed beads thrown in for fun too...


4.17.2012

Chain Link Bracelet DIY

A chain link bracelet is a classic and timeless accessory...

Max & Chloe
Michael Kors

Making this bracelet is as easy as picking up some pretty chain from your local jewelry supply store (or online).  Start with a piece of chain the approximate length of your desired bracelet.


Attach closures to each end of the adjusted length of chain using jump rings & wear!

4.03.2012

Bungee Cord Knot Bracelet

I been wanting to make my own jewelry with bungee cording; I also love the sailor knot trend.  Combining the two looks to make my own bracelet was super easy (albeit messy, considering I got super glue all over my fingers).

Supplies needed are: some bungee cord, end caps, a clasp, jump rings, and super glue.
Cut a piece of cord long enough to go around wrist after making a knot.  Lightly burn the ends with a flame to melt the cording and keep it from fraying. 


Tie a knot in the middle part of the cording:


Trim ends if needed to modify the length, then place a few drops of super glue in the end caps before affixing to each open end of the bungee cord.


Finally, affix closures to the end caps and enjoy!

3.26.2012

Embellished Zip Up Hoodie

So.... here is another Kourtney Kardashian inspired DIY (the other one posted here).  What can I say, I like her wardrobe!  I was inspired by a sweatshirt she wore and could not get the idea to embellish one myself this way out of my head.  Searching online, I could not find out what the actual garment was, so I made this going off of my memory.

All you will need are long tube beads, a zip up hoodie, a needle, some thread and a marking pencil. Feel free to play around with the design to your own liking.  Play around with your bead placement before beginning to sew them on.  Once you have an arrangement you are happy with, use a marking pencil to help guide the sewing process.  

I love wearing this hoodie so much more now!


3.16.2012

Painter Tape Nail Art

As a nail stencil, try using a hole punch with some painter's tape!  I used a heart shaped punch:


 You will need two different colors of polish.  Place tape over fully dried nail in base color and secure in place before applying second nail polish color:


Peel away the tape once nail polish is completely dry:


Finish off with clear topcoat.

3.13.2012

D Ring Bracelet

You may have noticed I tend to want to glue rhinestones onto pretty much anything I get my hands on... I initially set out to embellish a headband with some rhinestones, then ended up cropping it and using some D rings to turn it into a bracelet instead!

You will need an elastic stretchy headband (or some ribbon), rhinestones, strong glue, and some D rings:


Arrange and glue rhinestones on the headband:


Cut the headband into length that will wrap around wrist with some extra length to feed through the D ring closure.  Loop D rings on one end and secure by gluing edge of headband over the rings:


Finish the other end by folding over the edge 1/4 - 1/2 inch and gluing in place:


3.05.2012

Studded Friendship Bracelet

Sometimes the best weekends are those spent doing a lot of nothing.  I spent a large chunk of my time this past weekend catching up on season 2 of Downton Abbey & I can't think of a better way to spend an entire day. 

While watching the show, I started making a knotted chevron friendship bracelet (some detailed instructions here if you need a refresher).

To jazz up my end product, I studded it!  Now I can't wait to make a bunch more of these in different colors and sizes to wear together.


Just press the studs onto the bracelet wherever you'd like and bend in the prongs to secure in place:


Now, just finish the ends of the bracelet.  You can do this in a number of ways - I used gold end caps and clasps to match the gold studs.


2.13.2012

Chain & Rhinestone Wrapped Lanyard Bracelet

This is an updated take on the plastic lanyard bracelets you used to make as a kid...  (Design Sponge has a good tutorial here in case you need a quick refresher).

Once you've braided a piece that is long enough to make a bracelet, you will be ready to begin embellishing: use a jump ring to attach chain to the braided lanyard where you'd like to begin wrapping the chain.  I wrapped the chain around a strand of rhinestones, using the chain to secure the rhinestones in place on the outside of the lanyard.  Secure the chain to the bracelet where you'd like to finish wrapping it using another jump ring.  

Attach closures to the ends, and you're done!  
Make a few in different neon colors to wear together..


2.10.2012

File Folder Valentine Card

This idea was imparted to me by the ensemble cast movie Valentine's Day (the ensembles just keep growing, right???) - anyway, the best (and only?) positive thing that came out of watching that movie was being inspired to make this card!

All you will need are:

     * A red file folder
     * Patterned and plain colored paper
     * A few photos
     * Scissors
     * Double-sided tape or a glue stick

Decorate the front with hearts (you could cut out letters to make this look like a conversation heart) - I chose to keep mine simple:


Then, go as crazy as you want on the inside - I first lined the inside with tiny polka-dotted printed paper, then layered with my pictures and heart & letter cut-outs...


Such an easy and expressive way to show someone you care :-)

2.09.2012

Bead Looming

I just ordered a bead loom and am already so addicted...
Here are a few pieces I've got going so far, how-to and more to follow!

Soon-to-be bracelet...
Trim for a belt?
Ring...

2.07.2012

Jumbo Polka Dot Felted Sweater

When I saw this DIY on needle felting (on the always inspiring blog Honestly ...WTF), it was the answer to how I was going to recreate this sweater I've been wanting to make.  Confession: I saw it on Kourtney Kardashian on their show, and had to have one myself!  BUT, I didn't want to pay $280 for it!

SO, with a $15 sweater from H&M and $3 worth of wool roving, I made something very similar myself.  Of course, if you don't already have the felting supplies (I didn't) you will need a felting needle and a needle mat - these cost me about $30 total.  Of course, I will be using them again and again!


I used a roll of painter's tape as my polka dot stencil...


Place the needle mat under fabric where you'd like to position a polka dot, then lay stencil on top and fill evenly with wool roving fibers... Next, repeatedly stab with the felting needle to secure the wool fibers to your sweater until they are flat and smooth (making sure to hold the needle perpendicular to your fabric, never at an angle). 


Repeat throughout sweater until you are done with the polka dots (I did not apply spots to the back of my sweater).  Once they are all satisfactorily needle-felted in, spray lightly with water and press with an iron on wool setting.

Now you have your own jumbo polka-dotted sweater!

Related Posts Plugin for WordPress, Blogger...